上篇攻击AES的方法其实属于SPA,本实验用更牛逼的方法,DPA来攻击AES,而且是货真价实的AES。关于DPA,我前面有篇博客有所讲解(初识测信道攻击)。下面开始环境配置,这里需要注意的是,notebook中给出的SS_VER是’SS_VER_1_1’,我运行后总是失败,换成前面实验用的SS_VER_2_1就好了。这里编译、上传固件、安装就不多解释了,与之前实验一致。

1
2
3
4
SCOPETYPE = 'OPENADC'
PLATFORM = 'CWLITEARM'
CRYPTO_TARGET='TINYAES128C'
SS_VER='SS_VER_2_1'
1
%run "../../Setup_Scripts/Setup_Generic.ipynb"
1
2
3
%%bash -s "$PLATFORM" "$CRYPTO_TARGET" "$SS_VER"
cd ../../../hardware/victims/firmware/simpleserial-aes
make PLATFORM=$1 CRYPTO_TARGET=$2 SS_VER=$3 -j
1
cw.program_target(scope, prog, "../../../hardware/victims/firmware/simpleserial-aes/simpleserial-aes-{}.hex".format(PLATFORM))
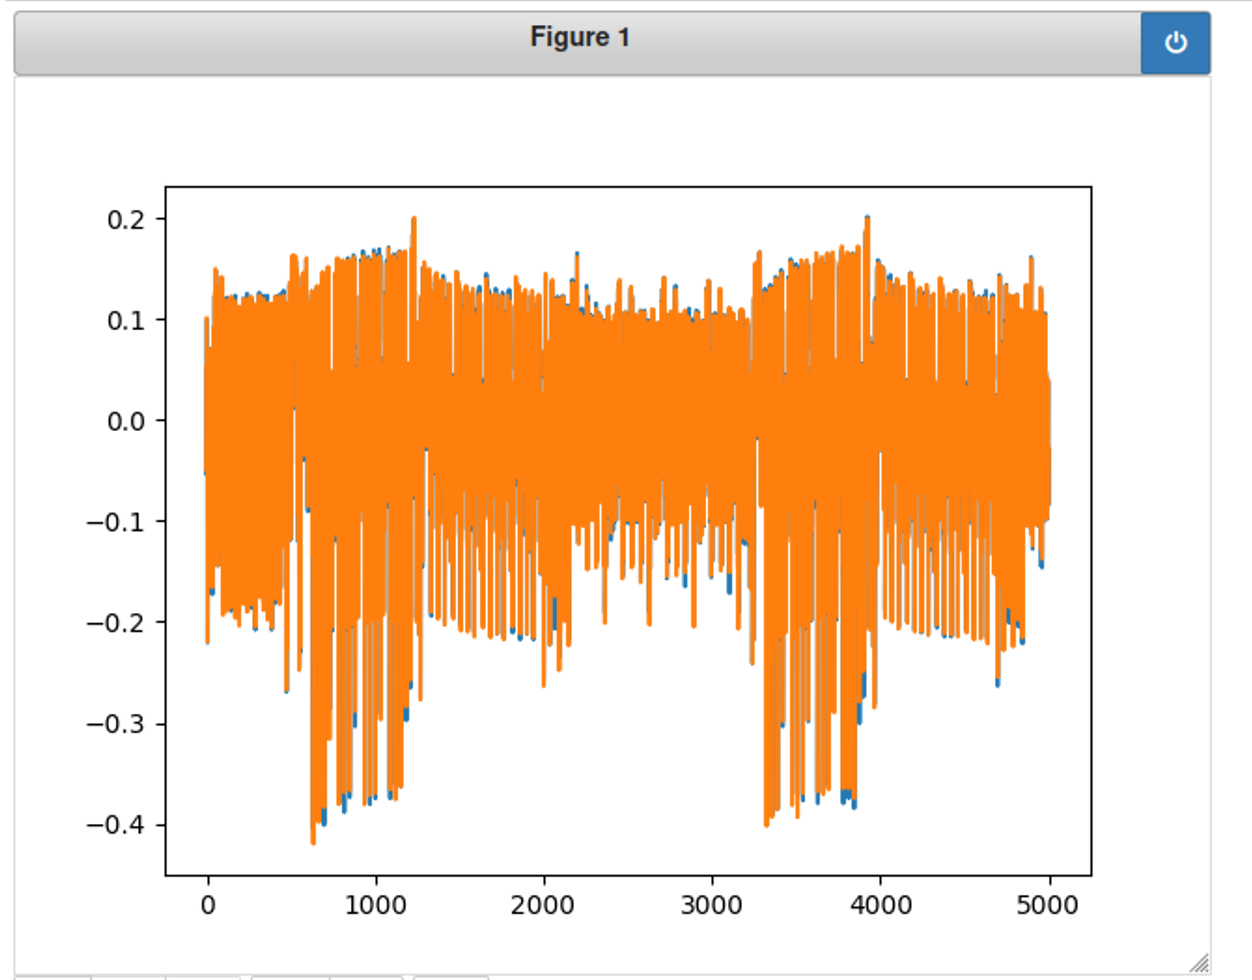
抓取2500条能量迹

1
2
3
4
5
6
7
8
9
10
11
12
13
14
15
16
17
18
19
20
21
22
23
24
25
26
27
28
29
from tqdm import tnrange
import numpy as np
import time

ktp = cw.ktp.Basic()
trace_array = []
textin_array = []

key, text = ktp.next()

target.set_key(key)

N = 2500
for i in tnrange(N, desc='Capturing traces'):
scope.arm()

target.simpleserial_write('p', text)

ret = scope.capture()
if ret:
print("Target timed out!")
continue

response = target.simpleserial_read('r', 16)

trace_array.append(scope.get_last_trace())
textin_array.append(text)

key, text = ktp.next()

在实验利用一个bit恢复AES key中之所以能成功是攻击流中存在S-box。本次实验使用能量分析去破解AES密钥。之前的方法能生效是因为我们攻击的数据流就在S-box中,而实战中我们不知道数值,只知道能量消耗,要找到他们对应的二进制是比较困难的。而本攻击方式是利用S-box输出结果的一个bit(无论哪个都行)将能量分成两个部分(0和1),利用1消耗能量是大于0的,而且根据之前的实验,数据总线中数据的值与能量消耗之间有一定联系。DPA分析AES只需要整个能量迹包含了加密流程发生的时间段。

S-box是固定的:

1
2
3
4
5
6
7
8
9
10
11
12
13
14
15
16
17
18
19
20
21
22
sbox = [
# 0 1 2 3 4 5 6 7 8 9 a b c d e f
0x63,0x7c,0x77,0x7b,0xf2,0x6b,0x6f,0xc5,0x30,0x01,0x67,0x2b,0xfe,0xd7,0xab,0x76, # 0
0xca,0x82,0xc9,0x7d,0xfa,0x59,0x47,0xf0,0xad,0xd4,0xa2,0xaf,0x9c,0xa4,0x72,0xc0, # 1
0xb7,0xfd,0x93,0x26,0x36,0x3f,0xf7,0xcc,0x34,0xa5,0xe5,0xf1,0x71,0xd8,0x31,0x15, # 2
0x04,0xc7,0x23,0xc3,0x18,0x96,0x05,0x9a,0x07,0x12,0x80,0xe2,0xeb,0x27,0xb2,0x75, # 3
0x09,0x83,0x2c,0x1a,0x1b,0x6e,0x5a,0xa0,0x52,0x3b,0xd6,0xb3,0x29,0xe3,0x2f,0x84, # 4
0x53,0xd1,0x00,0xed,0x20,0xfc,0xb1,0x5b,0x6a,0xcb,0xbe,0x39,0x4a,0x4c,0x58,0xcf, # 5
0xd0,0xef,0xaa,0xfb,0x43,0x4d,0x33,0x85,0x45,0xf9,0x02,0x7f,0x50,0x3c,0x9f,0xa8, # 6
0x51,0xa3,0x40,0x8f,0x92,0x9d,0x38,0xf5,0xbc,0xb6,0xda,0x21,0x10,0xff,0xf3,0xd2, # 7
0xcd,0x0c,0x13,0xec,0x5f,0x97,0x44,0x17,0xc4,0xa7,0x7e,0x3d,0x64,0x5d,0x19,0x73, # 8
0x60,0x81,0x4f,0xdc,0x22,0x2a,0x90,0x88,0x46,0xee,0xb8,0x14,0xde,0x5e,0x0b,0xdb, # 9
0xe0,0x32,0x3a,0x0a,0x49,0x06,0x24,0x5c,0xc2,0xd3,0xac,0x62,0x91,0x95,0xe4,0x79, # a
0xe7,0xc8,0x37,0x6d,0x8d,0xd5,0x4e,0xa9,0x6c,0x56,0xf4,0xea,0x65,0x7a,0xae,0x08, # b
0xba,0x78,0x25,0x2e,0x1c,0xa6,0xb4,0xc6,0xe8,0xdd,0x74,0x1f,0x4b,0xbd,0x8b,0x8a, # c
0x70,0x3e,0xb5,0x66,0x48,0x03,0xf6,0x0e,0x61,0x35,0x57,0xb9,0x86,0xc1,0x1d,0x9e, # d
0xe1,0xf8,0x98,0x11,0x69,0xd9,0x8e,0x94,0x9b,0x1e,0x87,0xe9,0xce,0x55,0x28,0xdf, # e
0x8c,0xa1,0x89,0x0d,0xbf,0xe6,0x42,0x68,0x41,0x99,0x2d,0x0f,0xb0,0x54,0xbb,0x16 # f
]

def aes_internal(inputdata, key):
return sbox[inputdata ^ key]

0,1两组对比的能量线

1
2
3
4
5
6
%matplotlib notebook
import matplotlib.pylab as plt
plt.figure()
plt.plot(trace_array[0])
plt.plot(trace_array[1])
plt.show()
image-20230527014113362

查看输入数据

1
2
print(textin_array[0])
print(textin_array[1])
1
2
CWbytearray(b'39 79 82 4f 97 0e a3 b9 1d 07 14 78 df 3c a7 89')
CWbytearray(b'c7 81 5d dd fe e3 29 b5 b4 3e 53 17 6f b3 37 4e')

定义能量迹的数量和每条能量迹的点的数量

1
2
numtraces = np.shape(trace_array)[0] #total number of traces
numpoints = np.shape(trace_array)[1] #samples per trace

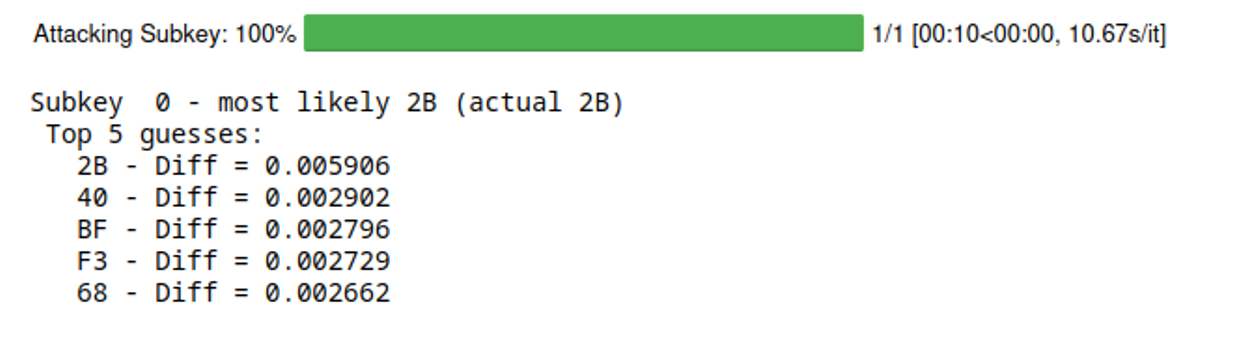
对两组能量迹取平均值,再取两者差的绝对值,看谁最大谁就最可能是密钥了

1
2
3
4
5
6
7
8
9
10
11
12
13
14
15
16
17
18
19
20
21
22
23
guess_byte = 0
for guess in range(256):

one_list = []
zero_list = []

for trace_index in range(numtraces):

input_byte = textin_array[trace_index][guess_byte]

#Get a hypothetical leakage list - use aes_internal(guess, input_byte)
hypothetical_leakage = aes_internal(guess, input_byte)

if (hypothetical_leakage & 0x01) == 1:
one_list.append(trace_array[trace_index])
else:
zero_list.append(trace_array[trace_index])

one_avg = np.mean(np.array(one_list), axis = 0)
zero_avg = np.mean(np.array(zero_list), axis = 0)

max_diff_value = max(abs(one_avg -zero_avg))
print("Guessing {:02x}: {}".format(guess, max_diff_value))

发现0x2b最大,即2b为key的第一个字节

1
2
3
4
5
6
7
8
9
10
11
12
13
14
15
Guessing 00: 0.0016756559017779837
Guessing 01: 0.0016902979846054461
Guessing 02: 0.0015728231728371483
....
....
....
....
Guessing 2a: 0.0015339731742831531
Guessing 2b: 0.0059058167148595825
Guessing 2c: 0.0016990212661401327
....
....
....
Guessing fe: 0.0014141100475279222
Guessing ff: 0.002171968556943134

计算差异的函数,也用来解决幽灵峰问题

1
2
3
4
5
6
7
8
9
10
11
12
13
14
15
16
17
18
def calculate_diffs(guess, byteindex=0, bitnum=0):
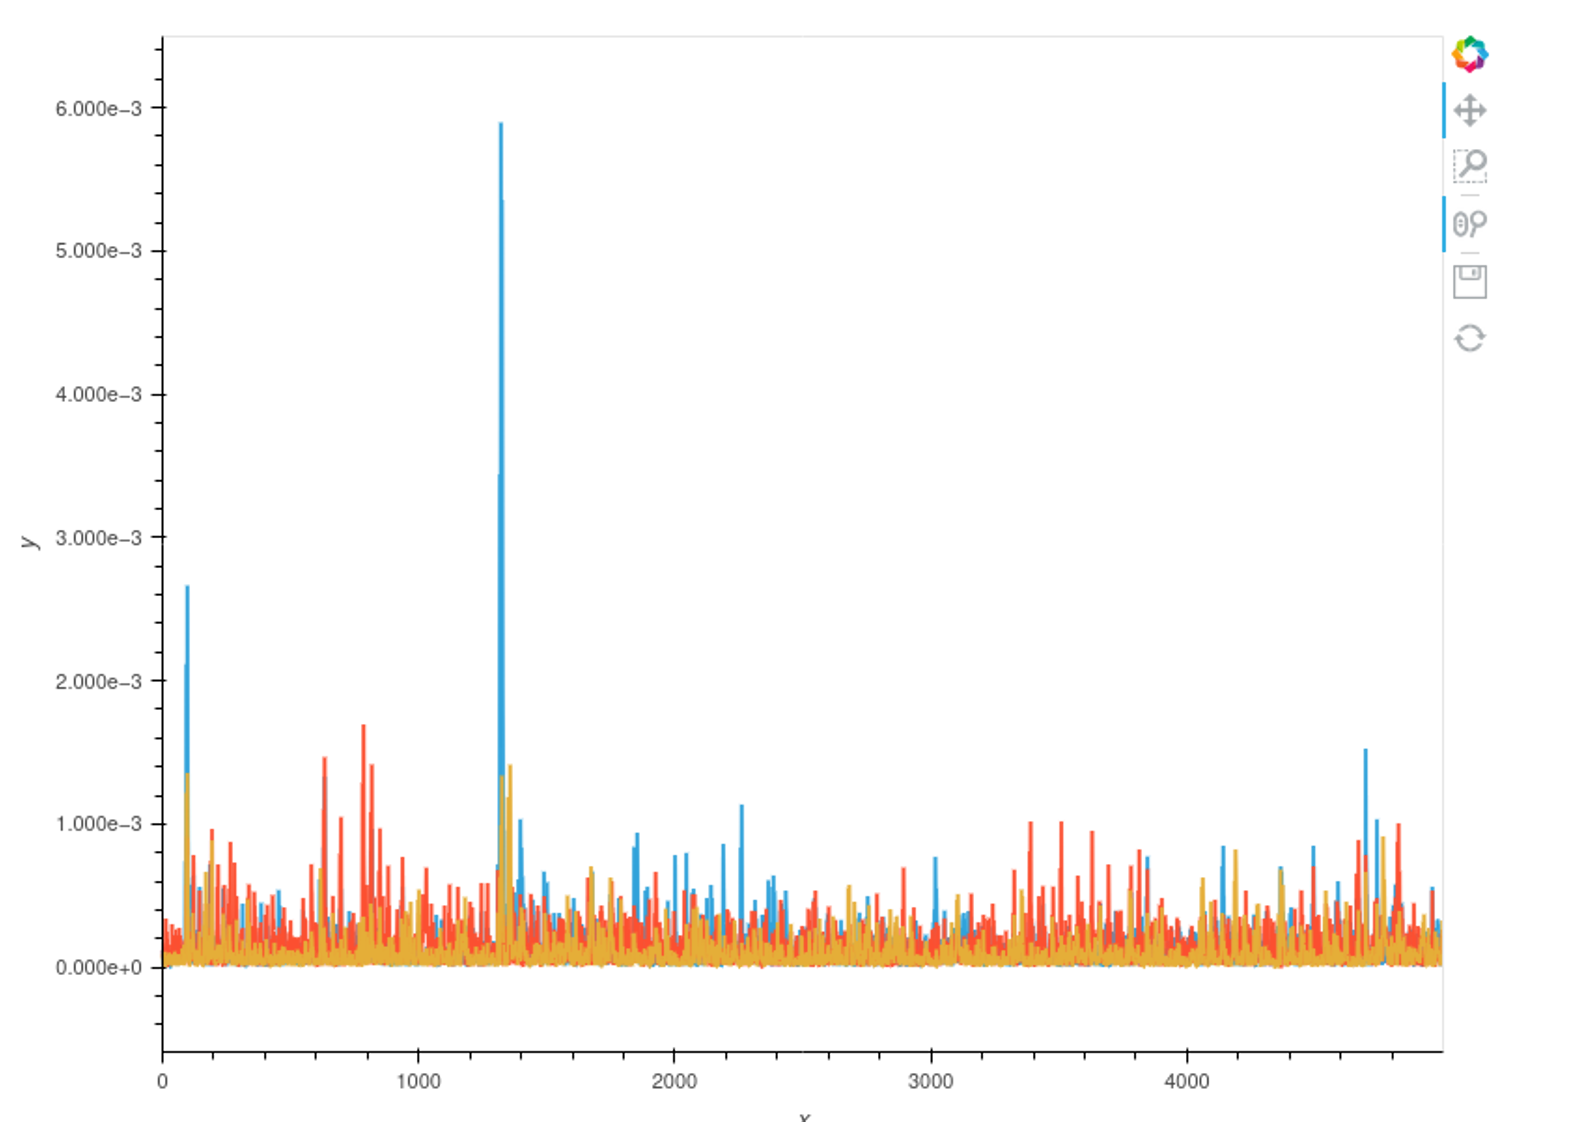
"""Perform a simple DPA on two traces, uses global `textin_array` and `trace_array` """

one_list = []
zero_list = []

for trace_index in range(numtraces):
hypothetical_leakage = aes_internal(guess, textin_array[trace_index][byteindex])

#Mask off the requested bit
if hypothetical_leakage & (1<<bitnum):
one_list.append(trace_array[trace_index])
else:
zero_list.append(trace_array[trace_index])

one_avg = np.asarray(one_list).mean(axis=0)
zero_avg = np.asarray(zero_list).mean(axis=0)
return abs(one_avg - zero_avg)

查看不同key对应的差异图

1
cw.plot(calculate_diffs(0x2B)) * cw.plot(calculate_diffs(0x2C)) * cw.plot(calculate_diffs(0x2D))
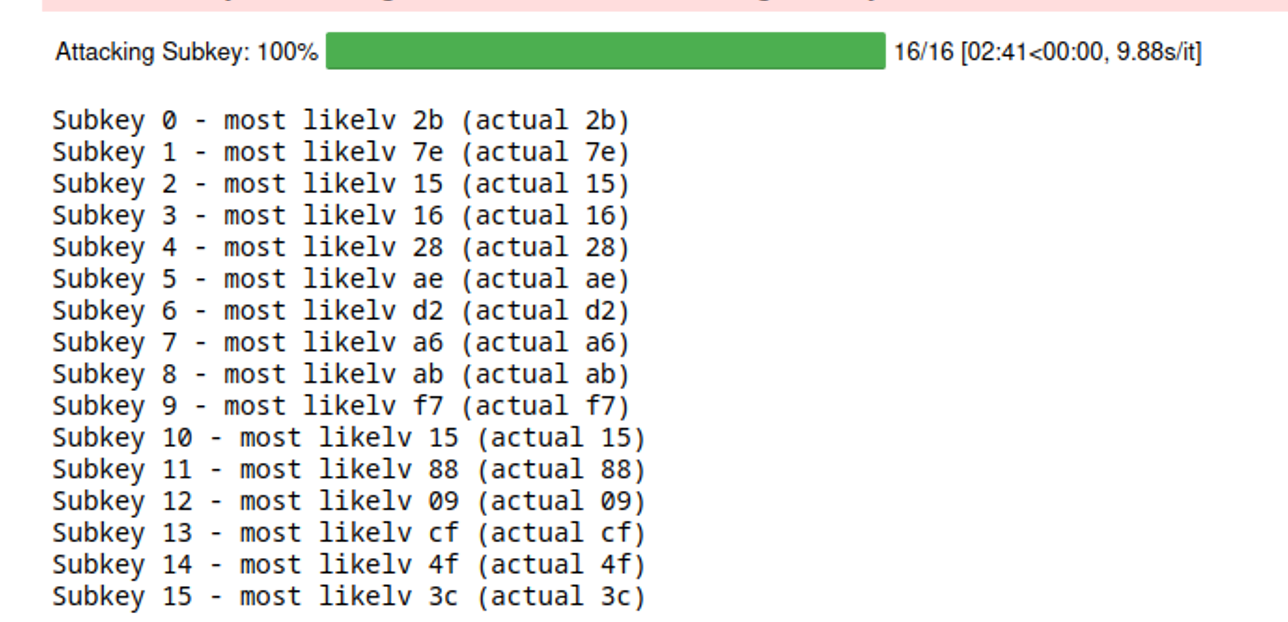
image-20230527040527620

最后就是把剩下的字节都猜了,补全代码

1
2
3
4
5
6
7
8
9
10
11
12
13
14
from tqdm import tnrange
import numpy as np

#Store your key_guess here, compare to known_key
key_guess = []
known_key = [0x2b, 0x7e, 0x15, 0x16, 0x28, 0xae, 0xd2, 0xa6, 0xab, 0xf7, 0x15, 0x88, 0x09, 0xcf, 0x4f, 0x3c]

for subkey in tnrange(0, 16, desc="Attacking Subkey"):
max_list=[]
for guess in range(256):
max_diff_value = max(calculate_diffs(guess, subkey))
max_list.append(max_diff_value)

print('Subkey {} - most likelv {:02x} (actual {:02x})'.format(subkey,np.argsort(max_list)[::-1][0], known_key[subkey]))

结果来看都猜对了!

image-20230527041126582

我这次实验是成功了,但也有一些情况是没有成功的,下面是关于DPA攻击失败的一些问题以及解决方式

  • 抓取的是幽灵峰的话可以尝试增加抓取的能量迹数量
  • 修改攻击的目标位数,如最低位改为第三位,或者把很多位的结果都跑一下综合一下

如何解决幽灵峰的问题

先运行下这段准备好的DPA攻击代码

1
2
3
4
5
6
7
8
9
10
11
12
13
14
15
16
17
18
19
20
21
22
23
24
25
26
27
28
29
30
31
32
33
34
35
36
37
38
39
40
41
from tqdm import tnrange
import numpy as np

#Store your key_guess here, compare to known_key
key_guess = []
known_key = [0x2b, 0x7e, 0x15, 0x16, 0x28, 0xae, 0xd2, 0xa6, 0xab, 0xf7, 0x15, 0x88, 0x09, 0xcf, 0x4f, 0x3c]

#Which bit to target
bitnum = 0

full_diffs_list = []

for subkey in tnrange(0, 1, desc="Attacking Subkey"):

max_diffs = [0]*256
full_diffs = [0]*256

for guess in range(0, 256):
full_diff_trace = calculate_diffs(guess, subkey, bitnum)
max_diffs[guess] = np.max(full_diff_trace)
full_diffs[guess] = full_diff_trace

#Make copy of the list
full_diffs_list.append(full_diffs[:])

#Get argument sort, as each index is the actual key guess.
sorted_args = np.argsort(max_diffs)[::-1]

#Keep most likely
key_guess.append(sorted_args[0])

#Print results
print("Subkey %2d - most likely %02X (actual %02X)"%(subkey, key_guess[subkey], known_key[subkey]))

#Print other top guesses
print(" Top 5 guesses: ")
for i in range(0, 5):
g = sorted_args[i]
print(" %02X - Diff = %f"%(g, max_diffs[g]))

print("\n")
image-20230527041851759

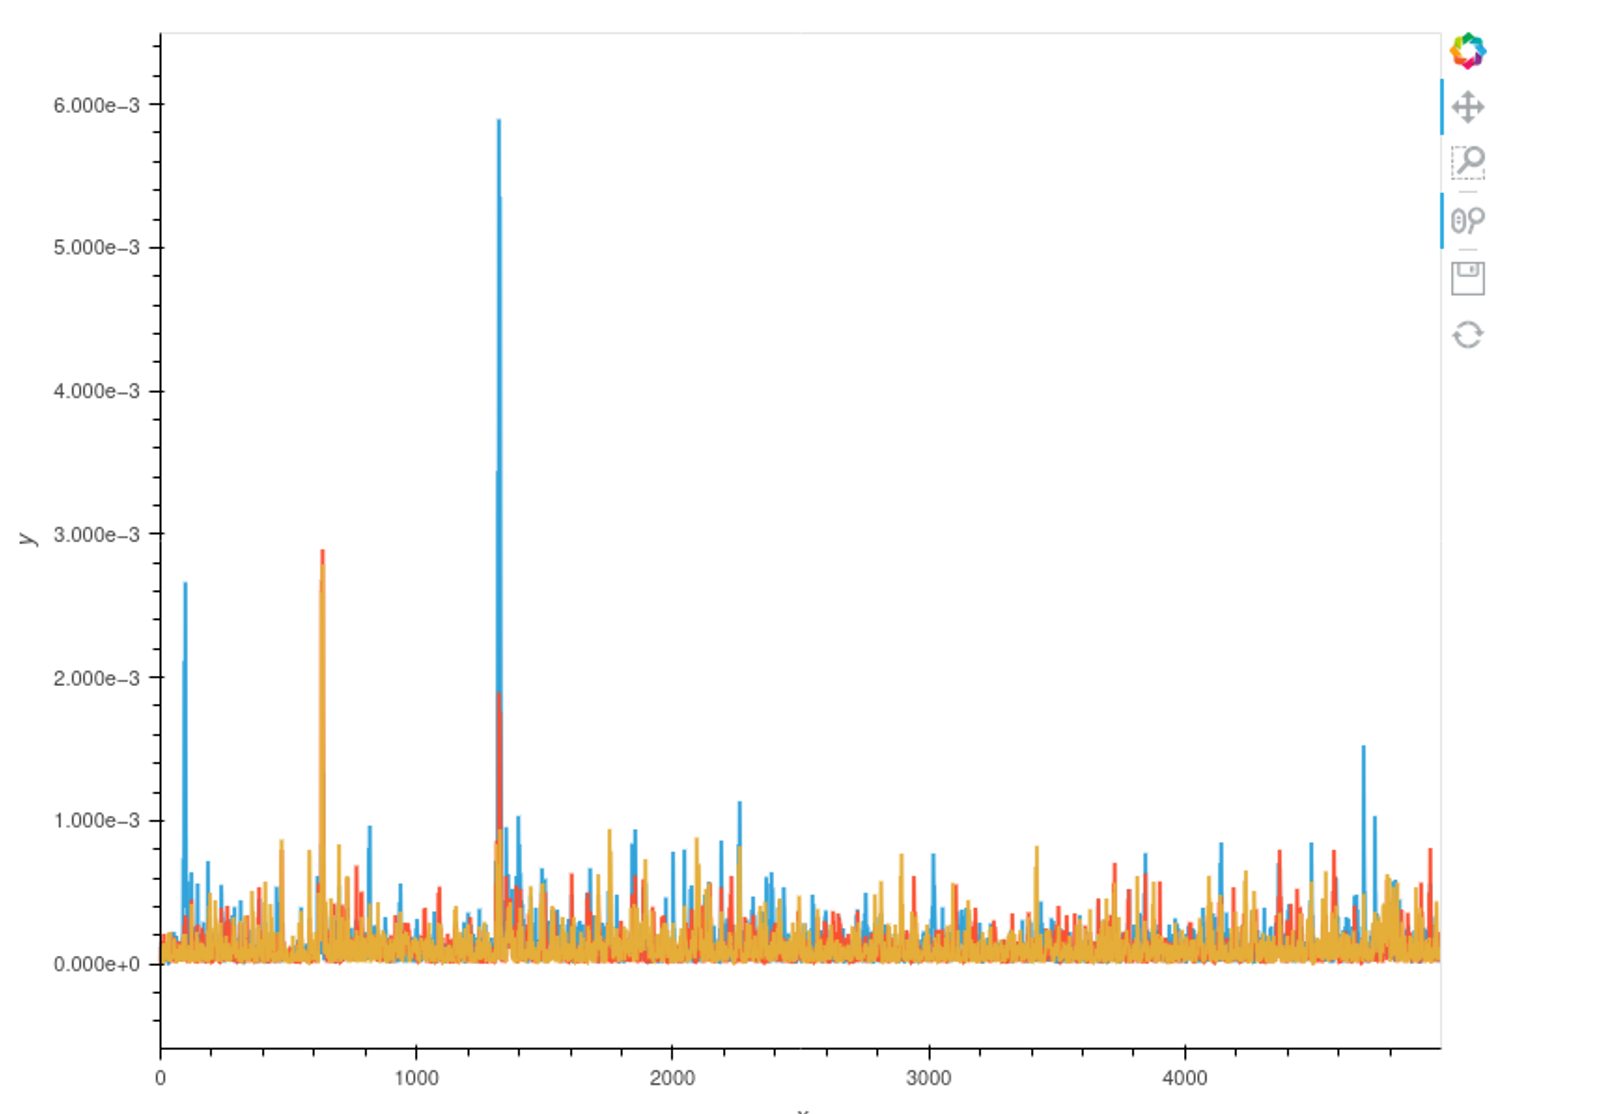
画出猜测错误key的前几个可能值和真实key的差异图

1
cw.plot(full_diffs_list[0][0x2B]) * cw.plot(full_diffs_list[0][0x40]) * cw.plot(full_diffs_list[0][0xBF])

正确key的峰形会在某些地方拥有比错误key的峰形高。

image-20230527043707408

有关幽灵峰的问题之后再细补充

Reference

Chipwhisperer-Jupyter